
Cold, tangy key lime pie bars with a crisp Biscoff crust and a white chocolate shell disappear fast because they hit three things at once: bright citrus, creamy filling, and that clean snap when you bite through the coating. Freezing the filling instead of baking it gives you a texture that lands somewhere between frozen cheesecake and pie filling, which is exactly why these bars feel special without being fussy.
The crust matters here. Biscoff crumbs bring more spice and deeper caramel notes than a plain graham crust, and that extra flavor keeps the bars from tasting flat once they’re frozen. The filling also leans on cream cheese, which keeps the lime layer creamy and smooth instead of icy, while the sweetened condensed milk gives it body and sweetness without needing a stove.
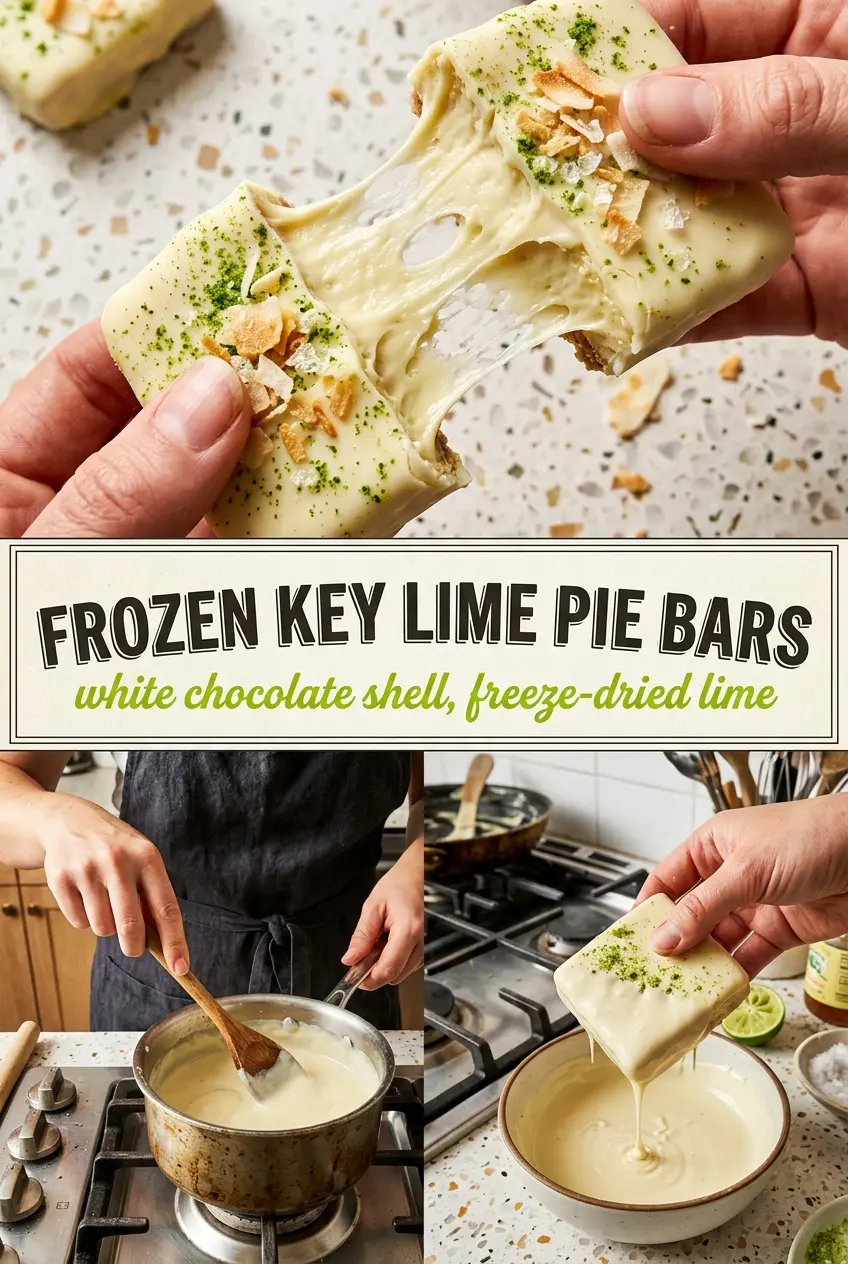
Below, I’m walking through the part that makes these bars work in real life: how to freeze them long enough for clean slicing, how to dip them fast before the chocolate sets, and why freeze-dried lime powder is worth tracking down for the finish.
The frozen filling sliced cleanly and the white chocolate shell cracked just like a candy bar. I loved that the lime powder stayed bright and tart instead of melting into the chocolate.
Pin these frozen key lime pie bars for the days when you want a tart, creamy dessert with a crackly white chocolate shell.
The Frozen Filling Has to Set Hard Before You Touch It
The biggest mistake with bars like these is trying to slice them before they’re fully frozen. The filling needs time to firm all the way through, not just on the surface, or the bars will smear when you cut them and the coating will slide off at the edges. Six hours is the bare minimum. Overnight is better if you want clean lines and a filling that holds its shape under the chocolate shell.
The second thing people get wrong is the dipping. Once the bar hits the melted chocolate, the shell starts setting almost immediately because the bars are frozen. That’s a good thing, but it also means you only get one clean pass. Have your toppings ready before the first bar goes in the chocolate, and work in a fast rhythm so the coating stays smooth instead of clumpy.
- Biscoff crumbs — These give the crust a spiced caramel flavor that plays better with lime than a plain graham crust. If you only have graham crackers, use them, but the finished bars will taste a little less complex.
- Cream cheese — This keeps the filling rich and creamy after freezing. Use full-fat cream cheese for the best texture; low-fat versions can turn a little icy once frozen.
- Key lime juice — Fresh is great if you can get it, but bottled key lime juice works well here because the filling is blended and frozen. Regular lime juice is the easiest substitute, though the flavor will be sharper and less floral.
- White chocolate — Use a bar or chips you’d actually eat on their own, because the coating is a big part of the dessert. Cheaper white baking coating can work, but it tends to taste sweeter and waxier.
- Freeze-dried lime powder — This is the finish that makes the bars look and taste special. Fresh zest won’t stay dry on the chocolate shell the same way, and it won’t give you that bold tart pop.
- Toasted coconut flakes — They add crunch and a little nutty flavor that keeps the bars from tasting one-note. Unsweetened flakes work best because the bars already have plenty of sweetness.
Building the Bars So the Shell Stays Snappy
Pressing and Freezing the Crust
Mix the Biscoff crumbs with the melted butter until every crumb looks evenly moistened, then press it firmly into a lined 8×8 pan. A loose crust will crumble when you slice the bars later, so take the extra minute to pack it down with the bottom of a glass or measuring cup. Freeze it for 20 minutes so the filling goes onto a firm base instead of sinking into soft crumbs.
Blending the Filling Until It’s Completely Smooth
Blend the cream cheese, condensed milk, egg yolks, and key lime juice until the mixture looks silky and a little thickened. If the cream cheese is even slightly lumpy at this stage, you’ll taste it after freezing. Scrape the bowl once or twice and keep blending until the filling looks glossy and uniform, then pour it over the crust and level the top.
Slicing and Dipping While the Bars Are Still Frozen
Freeze the pan until the filling is solid enough to slice cleanly, then cut into 9 bars while they’re still frozen. Work from the freezer to the parchment-lined sheet so the bars stay hard. Melt the white chocolate with coconut oil until smooth and fluid, then dip each bar quickly and let the excess drip off before the shell starts to set.
Finishing Before the Chocolate Grabs
The toppings have to go on immediately after dipping. Once the shell starts to firm up, the lime powder won’t stick evenly and the coconut will bounce right off. Dust the bars with the lime powder, toasted coconut, and a little flaky salt, then return them to the freezer for 10 minutes so the coating locks in cleanly.
Three Ways to Make These Bars Fit What You Have
Gluten-Free Version
Swap the Biscoff crumbs for a gluten-free cookie crumb that has some spice and sweetness. The texture will still hold together as long as the crumbs are fine and the butter is mixed through well. The flavor shifts a little, but the bars keep the same creamy frozen center and crisp shell.
Dairy-Free Adaptation
Use a dairy-free cream cheese and a sweetened condensed coconut milk product, then replace the white chocolate with a dairy-free white-style coating if you can find one. The bars will still freeze well, though the filling may be a touch softer than the original and the coating may not snap quite as cleanly.
More Tang, Less Sweet
Add a little extra key lime juice, but stop short of making the filling loose. The cream cheese and condensed milk need enough body to freeze into clean slices, so a small bump in citrus is enough to sharpen the flavor without wrecking the texture.
Storage and Reheating
- Refrigerator: These bars are best kept frozen, not chilled. In the fridge, the filling softens and the coating can sweat.
- Freezer: Store in a single layer until the chocolate is fully set, then transfer to an airtight container with parchment between layers. They keep well for about 2 weeks, though the shell is nicest in the first few days.
- Reheating: Don’t reheat these bars. Let them sit at room temperature for 5 to 8 minutes before serving so the filling loses that hard frozen bite without melting the shell.
Answers to the Questions Worth Asking
BEST Key Lime Pie Bars
Ingredients
Equipment
Method
- Mix Biscoff crumbs with melted butter until evenly moistened, then press firmly into a lined 8x8 pan to form a compact crust.
- Freeze the crust for 20 min until firm.
- Blend egg yolks, key lime juice, sweetened condensed milk, and cream cheese until smooth, then pour evenly over the frozen crust.
- Freeze for at least 6 hours or overnight until completely set.
- Remove the slab and slice into 9 bars while frozen, then place the bars on a parchment-lined sheet.
- Melt white chocolate with coconut oil until smooth, then dip each bar and let the excess drip back into the bowl.
- Immediately dust the dipped bars with freeze-dried lime powder, toasted coconut flakes, and flaky salt before the chocolate sets.
- Return the bars to the freezer for 10 min to fully firm the shell.
- Serve the bars frozen.