
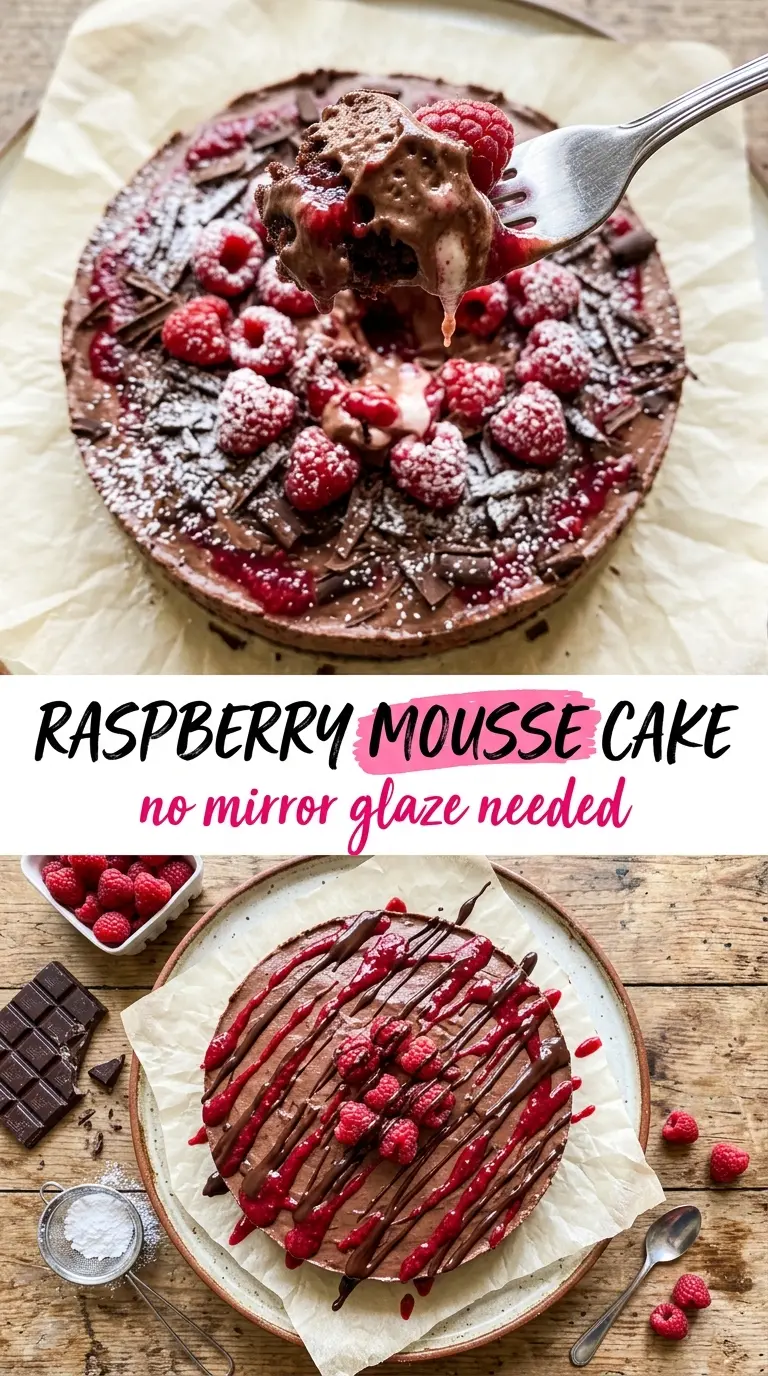
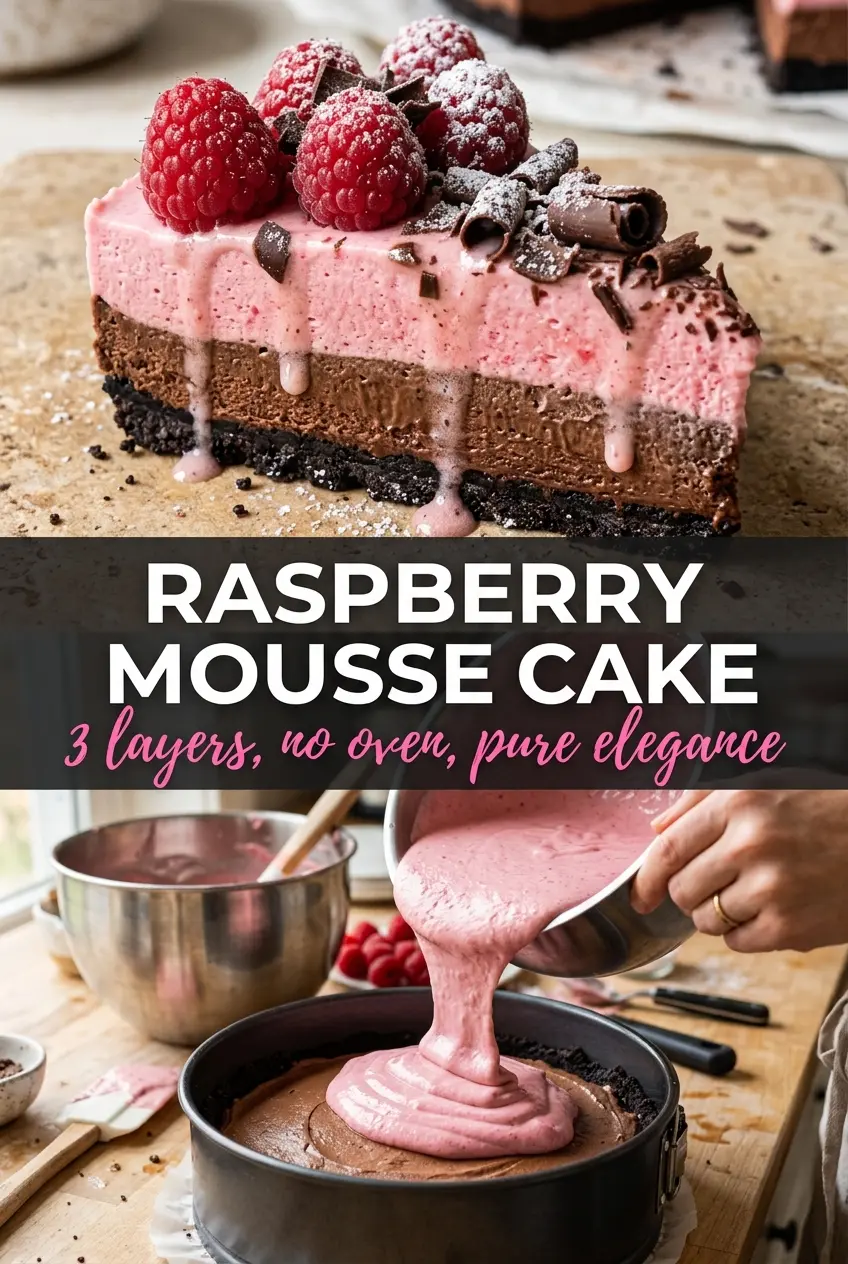
Chocolate raspberry mousse cake slices cleanly into three distinct layers: a crisp Oreo crust, a dark chocolate mousse that melts on the tongue, and a bright raspberry mousse that keeps the whole dessert from tasting heavy. The contrast is what makes it memorable. You get deep chocolate, tart fruit, and a chilled, airy texture that feels elegant without asking you to fuss with a glaze or a water bath.
The trick is building each layer with enough structure to hold the next one. The chocolate mousse sets from whipped cream and melted chocolate, while the raspberry layer gets its stability from gelatin and a well-strained purée. That straining step matters more than people think. If the raspberry seeds stay in, the top layer loses that smooth, creamy finish that makes the whole cake look and eat like a bakery dessert.
Below you’ll find the exact order that keeps the layers clean, plus the one timing detail that helps the cake unmold without tearing. The topping is simple on purpose, because this cake already has enough going on once you cut into it.
The layers set up beautifully and the raspberry mousse came out perfectly smooth after straining. I chilled it overnight and the slices held their shape without squishing.
Chocolate raspberry mousse cake is worth saving for when you want a chilled layered dessert with a clean slice and a dramatic finish.
The Layer That Fails If You Rush the Chill Time
The biggest mistake with a mousse cake like this is pouring the next layer onto a base that hasn’t set enough to support it. If the chocolate mousse is still soft, the raspberry layer sinks and the clean stripe between colors turns muddy. The answer is patience, but not blind patience. You want each layer firm enough to hold a spoon mark without sloshing when you tilt the pan.
The other trap is temperature. Warm mousse melts the layer underneath, and cold mousse thickens too fast and streaks when you spread it. The chocolate layer should be spreadable, not warm. The raspberry layer should be cool before it goes on top so the gelatin doesn’t start tightening in the bowl.
- Chocolate layer texture: It should look glossy and hold soft peaks once folded. If it turns grainy, the chocolate was too hot when it met the cream.
- Freezing between layers: A short freeze is what keeps the cake neat. Thirty minutes is enough for the chocolate to support the raspberry layer without becoming rock solid.
- Unmolding: The cake releases cleanest when it’s frozen through, then rested just long enough for the sides to lose their edge. Too warm and the base smears.
What Each Ingredient Is Actually Doing in This Cake
- Oreo crumbs and butter: This crust brings the crunch and the chocolate backbone. Oreos already contain fat and sweetness, so the crust sets up well without extra sugar. If you swap in plain chocolate wafers, add a spoonful of sugar so the base doesn’t taste flat.
- Dark chocolate: Use a chocolate you actually like eating. Since the mousse is only lightly sweetened, the chocolate flavor comes through clearly. A bar with 60 to 70 percent cacao gives the best balance; much darker than that can taste bitter once chilled.
- Heavy cream: The cream does the lifting in both mousse layers. Whip it to soft peaks, not stiff, or the mousse will get dense and difficult to spread. If you overwhip, stop and whisk in a spoonful of unwhipped cream to loosen it slightly before folding.
- Raspberries: Fresh or frozen both work for the purée, but the fruit must be strained well. Seeds break the silky texture and make the top layer feel rough. Save the nicest fresh berries for the top, where they matter most visually.
- Gelatin: This is what keeps the raspberry layer from turning into soft whipped fruit cream. Bloom it first, then dissolve it into the warm purée so it disappears completely. If you don’t let it hydrate before heating, you’ll end up with tiny rubbery bits in the mousse.
Building the Cake Layer by Layer Without Smearing the Edges
Pressing the Crust
Mix the Oreo crumbs with the melted butter until every crumb looks damp, like dark sand after rain. Press it firmly into the pan so the bottom feels compact instead of loose; that tight press is what gives you clean slices later. Chill it for 20 minutes so the butter firms up and the crust stops crumbling when the mousse goes on top.
Spreading the Chocolate Mousse
Fold the whipped cream into the melted chocolate in two additions so the mixture stays airy. The mousse should look smooth and thick but still spreadable. If the chocolate is too warm, it will melt the cream and turn loose; if it’s too cool, you’ll get streaks that won’t disappear. Spread it gently over the crust and freeze until the surface feels set to a light touch.
Finishing with the Raspberry Layer
Warm the strained raspberry purée just enough to dissolve the bloomed gelatin, then cool it before folding in the whipped cream. If you fold the cream into purée that is still hot, the mousse collapses and thins out. Pour it over the chocolate layer and smooth the top with an offset spatula, then freeze until the whole cake is firm enough to unmold cleanly.
The Final Topping
Run a warm knife or a little warm water around the pan to release the cake, then move it straight to a serving plate. Arrange the fresh raspberries while the surface is still cold. Add the chocolate shavings next, then dust with powdered sugar at the very last moment so it stays bright instead of melting into the berries.
Three Ways to Adapt This Mousse Cake Without Losing the Good Parts
Dairy-Free Version That Still Slices Cleanly
Use a dairy-free chocolate you like and swap in a full-fat coconut whipping cream for the heavy cream. The texture will be a little softer and the coconut flavor will show up, especially in the raspberry layer, but the cake still sets well if you chill it long enough. Keep the gelatin, since that’s what gives the fruit layer enough structure.
A More Intense Chocolate Center
Swap the dark chocolate for something closer to 70 percent cacao if you want a deeper, less sweet middle layer. That gives the cake a sharper chocolate edge against the raspberry, which works beautifully if you prefer a dessert that leans elegant instead of candy-sweet. Don’t go much darker than that unless you plan to add a little more sugar to the mousse.
Make-Ahead for a Dinner Party
This cake is better made ahead than rushed. Freeze it the day before, unmold it while fully firm, then keep it chilled until serving. The texture actually improves after a few hours in the fridge because the layers settle and the slices cut even cleaner.
Storage and Reheating
- Refrigerator: Store covered for up to 4 days. The crust softens a little, but the mousse layers stay neat.
- Freezer: This cake freezes well for up to 1 month. Wrap it tightly after it firms up, and thaw it in the refrigerator overnight before serving.
- Reheating: No reheating needed. Serve it chilled straight from the fridge after a brief rest on the counter so the mousse loses its icy edge.
Answers to the Questions Worth Asking
Chocolate Raspberry Mousse Cake
Ingredients
Equipment
Method
- Press Oreo crumbs mixed with melted butter firmly into the base of a lined pan or springform. Chill for 20 min until set and firm (visual cue: matte, holding together when lightly pressed).
- Melt chopped dark chocolate and let it cool slightly, then fold it into whipped heavy cream with sugar. Pour over the chilled crust and freeze for 30 min until the surface is set (visual cue: no longer soft when gently tapped).
- Bloom gelatin in 2 tbsp water until it looks thick and spongey, about 5 min. Warm the strained raspberry purée just until steam rises, then stir in the bloomed gelatin until fully dissolved (visual cue: smooth, no granules).
- Cool the raspberry mixture to room temperature, then fold it into whipped heavy cream gently until the mousse is evenly pale pink (visual cue: ribbons disappear and batter looks light and uniform).
- Pour the raspberry mousse over the frozen chocolate layer and smooth the top. Return to the freezer for 4+ hours to set firmly (visual cue: sliceable firmness).
- Unmold the cake and transfer to a serving plate without waiting long at room temperature (visual cue: clean edges). Arrange fresh whole raspberries on top, then shave dark chocolate over the berries and dust with powdered sugar immediately before serving (visual cue: powdered sugar stays white and doesn’t bleed).