
Golden air fryer bread with a soft, tender middle and a lightly crisped crust has a way of disappearing before it even cools. The outside gets that pleasant chew you want from fresh bread, while the inside stays fluffy and warm instead of turning dry or dense. It tastes like you put in far more effort than you did, which is exactly why this one earns a spot in the regular rotation.
The trick is using self-rising flour and Greek yogurt together. That combination gives you lift without yeast, kneading, or waiting around for dough to proof. The yogurt also brings enough moisture and tang to keep the crumb tender, while the air fryer moves hot air around the dough fast enough to set the outside before the inside overcooks. If the dough feels sticky at first, that’s normal; it comes together once you knead it for a couple of minutes.
Below, I’ve laid out the small details that matter most: how to handle the dough, why the topping choices change the crust, and what to do if you want to turn this into flatbreads or small rolls instead.
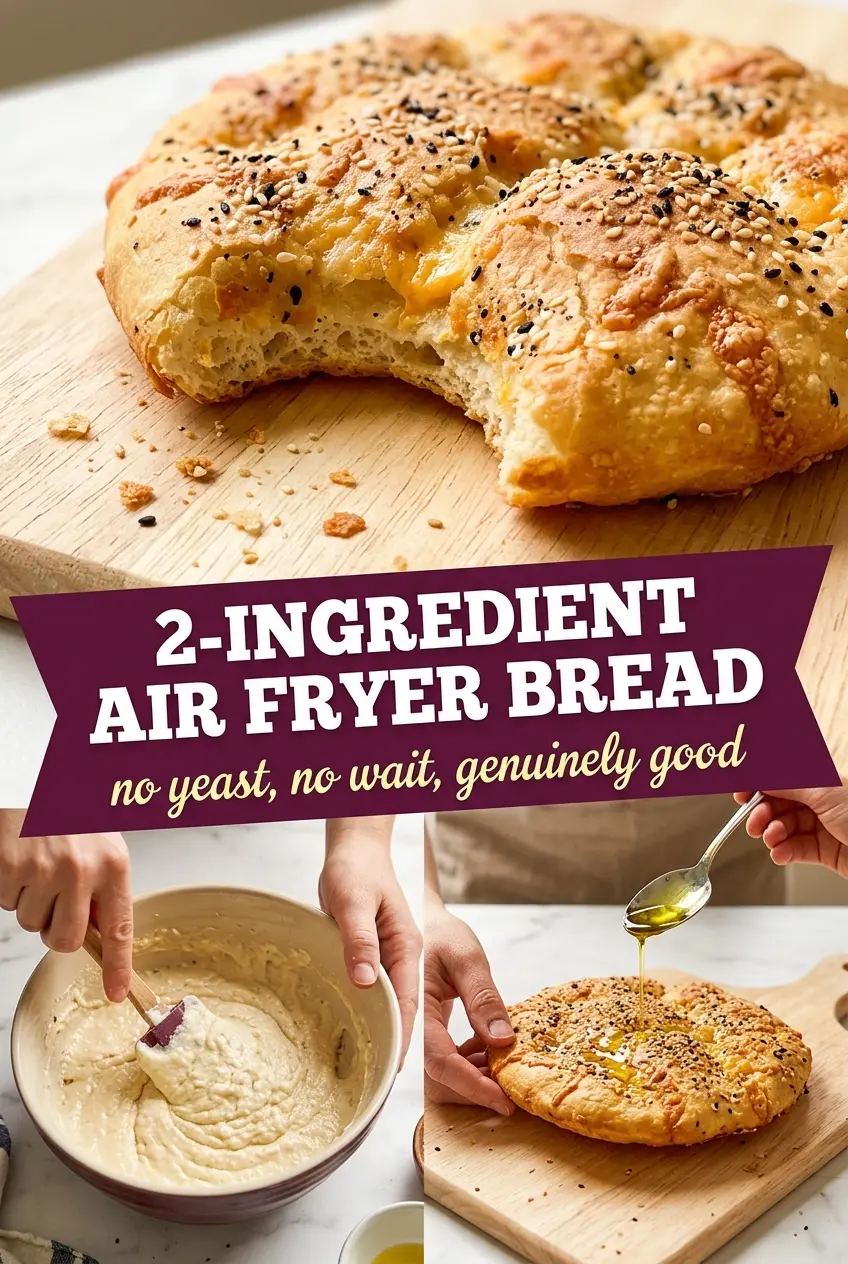
The dough came together in minutes and the bread had this soft, almost biscuit-like middle with a crisp top. I brushed on olive oil and everything bagel seasoning, and it tasted fresh enough to eat plain.
This air fryer bread is the quickest way to get a golden crust and soft middle without yeast or rising time.
The Reason Self-Rising Flour and Yogurt Work Faster Than Yeast
Most quick breads fail in one of two ways: they turn gummy in the center or dry out before the outside picks up any real color. This dough avoids both because the self-rising flour already contains the leavening you need, and the Greek yogurt adds moisture without making the dough slack. You get lift from the chemistry, not from waiting on fermentation.
The other thing that matters is restraint. Once the flour and yogurt come together, the dough only needs a short knead to smooth out the rough edges. Overworking it makes the bread tighter and less tender. If the dough feels shaggy at first, keep going for those two minutes; it should end up soft, smooth, and just a little tacky, not sticky enough to coat your hands.
What the Garlic Powder, Yogurt, and Toppings Are Doing Here

- Self-rising flour — This is the backbone of the whole recipe. It already includes baking powder and salt, which is why the bread lifts without yeast. If you only have all-purpose flour, you can use it, but you’ll need to add your own leavener and salt, and the result won’t rise quite as evenly.
- Greek yogurt — Full-fat Greek yogurt gives the best texture here because it adds moisture and body at the same time. Regular yogurt can work if that’s what you have, but the dough may be a little softer and need a touch more flour. Don’t use a thin, watery yogurt unless you’re ready to adjust by feel.
- Garlic powder — This brings savory depth without adding moisture. Fresh garlic would brown too fast and can taste harsh in this quick-cooking dough, so the powder is the better choice for even flavor.
- Olive oil — Brushing the outside helps the dough color instead of drying out in the air fryer. It also gives toppings something to cling to and keeps the crust from turning dusty or pale.
- Everything bagel seasoning, cheddar, or dried herbs — These are optional, but they’re worth using if you want the top to feel more like a finished bread than a plain dough round. Cheddar adds pockets of salty richness, while herbs give you a more savory, bakery-style crust.
The 15 Minutes That Turn Dough Into Bread
Mixing the Dough Until It Feels Unified
Stir the flour, yogurt, garlic powder, and salt until the mixture looks rough and shaggy, then bring it together with your hands. At first it may seem too dry or too sticky depending on the yogurt, but that balance settles once the dough starts to absorb itself. If it’s sticking hard to your fingers, dust in a little more flour; if it’s crumbly and won’t hold, add a spoonful of yogurt. The goal is a dough that holds together in one piece before you move on.
Kneading Just Long Enough To Smooth It Out
Knead for about 2 minutes, not 10. You’re not building gluten for chewy sandwich bread here; you’re just smoothing the dough so it cooks evenly. When it’s ready, the surface will look less rough and the dough will feel supple instead of lumpy. If you keep kneading past that point, the bread can turn a little tough around the edges after air frying.
Shaping for More Than One Finish
Shape the dough into one flat round for a tear-and-share bread or divide it into smaller rolls if you want faster, more even cooking. A flatter shape gives you more surface area for browning, while smaller pieces bake through a little more quickly and are easier to serve with soup or dip. Keep the thickness even so the center doesn’t lag behind the edges. Thin spots will dry out before the middle finishes.
Air Frying Until the Crust Turns Deep Gold
Brush the dough with olive oil, add your toppings, and air fry at 360°F until the top is golden and the bread feels set when lightly pressed. Don’t pull it the second the outside looks colored; the center needs those last few minutes to finish steaming and set its crumb. If your air fryer runs hot, start checking a minute or two early. You’re looking for a crust that sounds slightly crisp when tapped, not a pale surface that still feels doughy underneath.
Three Ways To Change the Shape, Flavor, or Dietary Fit
Naan-Style Flatbreads
Flatten the dough into thinner ovals instead of one thick round and cook them in batches. The thinner shape gives you more browned surface and a softer, more flexible bread that works well for scooping or wrapping. These finish faster than the larger round, so start checking early or the edges can dry before the middle is set.
Cheddar Herb Bread
Fold shredded cheddar and dried herbs into the dough before shaping, then finish with a little more on top. The cheese gives you salty pockets and a more savory crust, but it also makes the surface brown faster, so keep an eye on color near the end. This version is great when you want something that can stand in for a side bread at dinner.
Gluten-Free Version
A standard gluten-free flour blend can work here if it already includes xanthan gum or a similar binder. The texture will be a little more tender and less chewy, and the dough may need a short rest so the flour hydrates fully. If it feels too slack, add a spoonful of blend at a time until it’s shapeable.
Dairy-Free Swap
Use an unsweetened, thick dairy-free yogurt with a similar texture to Greek yogurt. Coconut-based versions can work, but they may leave a faint flavor behind, so a plain almond- or cashew-based yogurt is usually cleaner here. Watch the dough closely, since some dairy-free yogurts are looser and need a touch more flour to shape neatly.
Storage and Reheating
- Refrigerator: Store in an airtight container for up to 3 days. The crust softens in the fridge, but the bread stays usable for sandwiches or toast.
- Freezer: It freezes well. Wrap tightly, then freeze for up to 2 months. Thaw at room temperature before reheating so the center doesn’t stay cold while the outside dries out.
- Reheating: Use the air fryer at 320°F for 3 to 4 minutes or a dry skillet over medium-low heat. The common mistake is blasting it too hot, which hardens the crust before the inside warms through.
Questions I Get Asked About This Recipe
Bread Recipe Air Fryer
Ingredients
Equipment
Method
- In a bowl, mix self-rising flour, Greek yogurt, garlic powder, and salt until a shaggy dough forms.
- Knead the dough for 2 minutes until smooth, then stop—no yeast and no rise time are needed.
- Shape the dough into a flatbread round or into small rolls.
- Brush the dough lightly with olive oil, then add everything bagel seasoning and/or shredded cheddar and/or dried herbs if using.
- Preheat the air fryer, then air fry at 360°F for 12–15 minutes until golden with visible surface cracking.
- Serve warm immediately for the best soft interior and crispy olive oil exterior.