
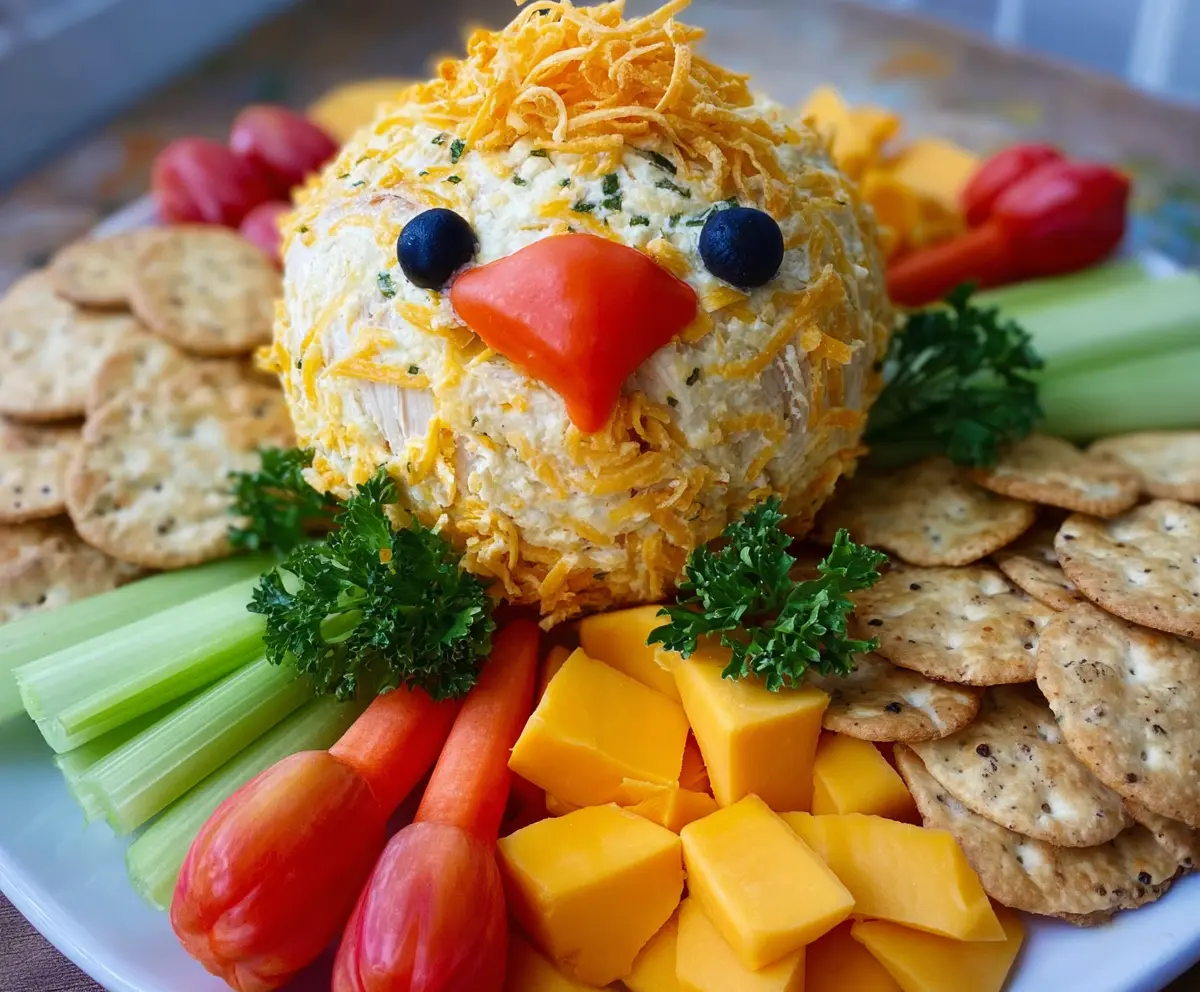
The Spring Chick Cheeseball with Cheddar is a fun and festive appetizer that looks as delightful as it tastes. It’s a creamy cheddar cheese mixture shaped into a cute little chick, perfect for brightening up any spring gathering or holiday table. The sharp cheddar gives it a rich flavor, while the decorative touches make it super charming and inviting.
I love making this cheeseball because it always brings smiles and gets conversations started. It’s one of those dishes that’s both easy to prepare and a little bit special, especially when you add your personal twist with favorite herbs or a colorful veggie collar. I find that chilling it well before serving really helps the flavors come together and makes it easier to shape.
For me, this cheeseball is a real crowd-pleaser at any spring party or family brunch. I like to serve it with an assortment of crackers and fresh vegetables, so everyone can scoop up their favorite bites. Plus, it’s a great way to add a playful touch to the table without spending hours in the kitchen. Whenever I bring this along, it tends to disappear pretty quickly!
Key Ingredients & Substitutions
Cream Cheese: This is the base of the cheeseball, giving it that soft and spreadable texture. Make sure it’s softened for easy mixing. If you prefer dairy-free, try a plant-based cream cheese.
Cheddar Cheese: Sharp cheddar adds flavor and the “feather” texture outside. You can swap for mild cheddar if you want a less intense taste or use a mix of cheddar and Monterey Jack for creaminess.
Dijon Mustard: Adds a little tang and depth. If you don’t have Dijon, yellow mustard works fine but with a milder flavor.
Smoked Paprika (optional): Gives a gentle smoky note. If not available, try regular paprika or omit it for a milder flavor.
How Do I Shape and Decorate the Chick Cheeseball Perfectly?
Shaping and decorating bring the chick to life. Start by forming a smooth ball to resemble the chick’s body. Use wet hands to avoid sticking.
- Press shredded cheddar evenly on the outside for feather texture—pat, don’t rub.
- Place olive slices gently as eyes near the top; use tweezers for precision if needed.
- Attach the red bell pepper wedge just below eyes for the beak—press slightly to hold.
- Add small cheese pieces or crisps on the sides for wings.
- Arrange fresh greens as grass below for a natural look.
- For a spring touch, place edible flowers around but keep them light to avoid overshadowing.
Chill before serving so the ball firms up and decorations stay in place.
Equipment You’ll Need
- Mixing bowl – I use a large one so I can combine everything easily without spills.
- Spatula or wooden spoon – helpful for mixing all ingredients smoothly and thoroughly.
- Serving platter or plate – to display your chick cheeseball attractively.
- Small spoon or tweezers – perfect for placing olives, red bell pepper, and cheese decorations precisely.
- Knife – for shaping the beak and chopping any additional toppings or garnishes.
Flavor Variations & Add-Ins
- Switch cheese inside to pepper jack or mozzarella for a milder or different flavor profile.
- Add chopped herbs like chives, parsley, or dill into the cheese mixture for a fresh taste.
- Use different proteins like cooked bacon bits or diced ham mixed into the cheese for added flavor.
- Swap the red bell pepper beak for small cherry tomato wedges for a different color and taste.
Spring Chick Cheeseball with Cheddar
Ingredients You’ll Need:
For The Cheeseball:
- 8 oz cream cheese, softened
- 2 cups shredded sharp cheddar cheese, divided (about 1 ½ cups for inside, ½ cup for outside)
- ¼ cup mayonnaise
- 1 tbsp Dijon mustard
- ½ tsp garlic powder
- ¼ tsp onion powder
- ¼ tsp smoked paprika (optional)
- Salt and pepper to taste
For Decoration:
- 1 black olive, sliced (for eyes)
- 1 wedge or piece of red bell pepper (for beak)
- Fresh greens (such as watercress or parsley) for garnish
- Edible flowers (optional)
For Serving:
- Crackers or sliced cheddar cheese
How Much Time Will You Need?
This recipe takes about 15 minutes to prepare. You can serve it right away, or chill it for 30 minutes to firm up and let the flavors blend beautifully.
Step-by-Step Instructions:
1. Mixing the Cheeseball:
In a large bowl, combine the softened cream cheese, 1 ½ cups shredded cheddar, mayonnaise, Dijon mustard, garlic powder, onion powder, smoked paprika (if using), salt, and pepper. Stir well until everything is mixed evenly and smooth.
2. Shaping the Chick:
Form the cheese mixture into a round ball on a plate or serving platter to look like the chick’s body. Use your hands to smooth the surface as best as you can.
3. Adding the Feather Texture:
Take the remaining ½ cup of shredded cheddar and press it onto the outside of the cheeseball all over. This creates a lovely textured “feather” look.
4. Decorating the Face:
Place two slices of black olives near the top center of the ball to form the eyes. Then, gently press the red bell pepper wedge just below and between the eyes to make the beak.
5. Final Touches:
If you’d like, add small cheese pieces or cheddar crisps on each side for wings. Arrange fresh greens around the base to mimic grass, and sprinkle edible flowers around the chick for a cheerful springtime feel.
6. Serving Your Cheeseball:
Serve the Spring Chick Cheeseball with crackers or cheddar slices for dipping. Enjoy this cute and tasty centerpiece at your gathering!
Can I Use Frozen Cream Cheese for This Recipe?
It’s best to use softened cream cheese for easy mixing. If using frozen, thaw it in the fridge overnight and then let it sit at room temperature for about 30 minutes before preparing.
How Can I Make This Cheeseball Ahead of Time?
You can prepare the entire cheeseball a day in advance. Cover it tightly with plastic wrap and refrigerate. Let it sit at room temperature for 15–20 minutes before serving to soften slightly.
What Can I Substitute for Red Bell Pepper for the Beak?
If you don’t have red bell pepper, try using small carrot sticks, cherry tomato wedges, or even a piece of yellow bell pepper for a colorful alternative.
How Should I Store Leftovers?
Wrap any leftover cheeseball tightly in plastic wrap or store in an airtight container in the fridge for up to 3 days. Bring to room temperature before serving again for best texture and flavor.