
Juicy chicken breasts filled with melted mozzarella, sweet roasted red peppers, and wilted spinach turn into one of those dinners that looks far more complicated than it is. The outside gets a deep golden sear, the cheese melts into the vegetables, and every slice holds together long enough to plate cleanly instead of spilling out onto the cutting board. It’s the kind of stuffed chicken that earns a repeat spot because it gives you a crisp edge, a creamy center, and enough color to make the whole plate feel finished.
The trick is keeping the filling dry enough to stay inside the chicken and cool enough that it doesn’t start softening the cheese before it hits the oven. I cook the spinach first so the extra moisture cooks off, then let it cool before mixing it with the peppers and mozzarella. Searing before baking gives the chicken flavor and helps seal the pocket, but the real payoff comes from letting the breasts rest after they come out of the oven so the juices settle back in instead of flooding the plate.
The filling stayed put when I seared it, and the mozzarella melted into the peppers without making everything watery. I added the toothpicks like you suggested and the chicken came out juicy all the way through.
Roasted red pepper spinach and mozzarella stuffed chicken is the kind of dinner worth keeping handy for nights when you want a crisp sear and a cheesy center without a long ingredient list.
The Part That Keeps Stuffed Chicken From Leaking Everywhere
Most stuffed chicken fails before it even gets to the oven. The pocket gets cut too wide, the filling goes in hot, or the breasts are so uneven that one side dries out before the center is done. This version avoids all three problems by keeping the pocket narrow, cooling the filling slightly, and searing first so the outside has a chance to set before the oven finishes the job.
The other mistake is overstuffing. More filling does not mean a better slice; it usually means the seam bursts and the cheese runs out into the pan. A modest amount gives you clean slices and a better chicken-to-filling balance, which is what makes this dish feel intentional instead of messy.
What the Spinach, Peppers, and Mozzarella Are Each Doing Here

- Chicken breasts — Boneless breasts are the right cut here because they’re thick enough to slice into a pocket and wide enough to hold a filling without falling apart. If one end is much thicker than the other, a gentle pound with a mallet helps them cook at the same pace.
- Baby spinach — Spinach needs to be wilted first because raw leaves collapse in the oven and release water into the filling. Cook it just until the moisture cooks off, then let it cool before mixing so it doesn’t melt the mozzarella early.
- Roasted red peppers — These bring sweetness and a soft, silky texture that balances the cheese. Jarred peppers work well; just drain and chop them so they don’t carry extra liquid into the pocket.
- Mozzarella — Shredded mozzarella gives you the stretchy, melty center this dish needs. A low-moisture mozzarella is the better choice here because fresh mozzarella can leak too much water as it melts.
- Garlic — The garlic gets cooked with the spinach so it loses the raw bite and blends into the filling instead of standing out sharply. Mince it fine so it distributes evenly and doesn’t burn during the sear.
- Olive oil — You only need enough to get the chicken moving in the pan and help the exterior brown. A neutral oil also works, but olive oil gives the finished chicken a little more depth.
How to Build the Sear and Bake Without Drying Out the Chicken
Prepare the pockets and filling
Slice a deep pocket into the side of each chicken breast without cutting all the way through. You want an opening that can hold the filling but still leaves enough meat around the edges to seal. Wilt the spinach with the garlic first, then let it cool before mixing it with the peppers and mozzarella. If that filling goes in steaming hot, the cheese starts softening before the chicken hits the skillet and the whole pocket gets harder to manage.
Stuff and secure the chicken
Pack the filling in firmly, but don’t force so much inside that the seam stretches open. Toothpicks help keep the opening shut while the chicken sears, and they’re worth using because they prevent the filling from slipping out as soon as the breast hits the pan. Season the outside well with salt and pepper so the meat itself tastes seasoned, not just the filling.
Get the color on the outside first
Sear the chicken in olive oil over medium-high heat until the surface turns golden and releases from the pan without sticking. If it clings hard, it’s not ready to turn yet. You’re not cooking it through here; you’re building flavor and giving the exterior enough structure to hold up in the oven. The pan should be hot enough for a clean sizzle, not so hot that the outside scorches before the center has a chance to cook.
Finish in the oven and rest before slicing
Transfer the skillet to the oven and bake until the thickest part of the chicken reaches 165°F and the juices run clear. The center should feel firm with a slight spring, not squishy. Let the chicken rest for five minutes before slicing so the cheese settles back into the pocket instead of spilling out the second you cut into it. That short rest makes a bigger difference than people expect.
Ways to Adjust This Without Losing the Point of the Dish
Make it dairy-free
Use a meltable dairy-free mozzarella-style shreds that are designed for cooking, not a soft spread. The texture won’t be identical, but it will still give you a creamy center instead of a dry vegetable filling.
Swap in provolone or fontina
Provolone gives a sharper melt and a little more salt, while fontina turns especially silky. Either one works in place of mozzarella if you want a deeper cheese flavor, but keep the amount the same so the filling doesn’t spill out.
Make it keto-friendly as written
This recipe already fits a low-carb or keto approach because the filling is built from vegetables, cheese, and chicken. If you’re watching carbs closely, keep an eye on the roasted peppers and use peppers packed without added sugar.
Use thawed frozen spinach
Frozen spinach works if you squeeze it dry until it stops dripping. That step matters more than anything else in the filling, because excess water is what makes stuffed chicken leak and steam instead of brown.
Storage and Reheating
- Refrigerator: Store leftovers in an airtight container for up to 3 days. The chicken stays juicy, but the cheese will firm up as it chills.
- Freezer: It freezes well after cooking. Wrap individual portions tightly and freeze for up to 2 months, though the mozzarella will lose a little of its stretch after thawing.
- Reheating: Reheat covered in a 325°F oven until warmed through, or use short bursts in the microwave at medium power. High heat dries out the chicken fast and can push the filling out of the pocket.
Questions I Get Asked About This Recipe
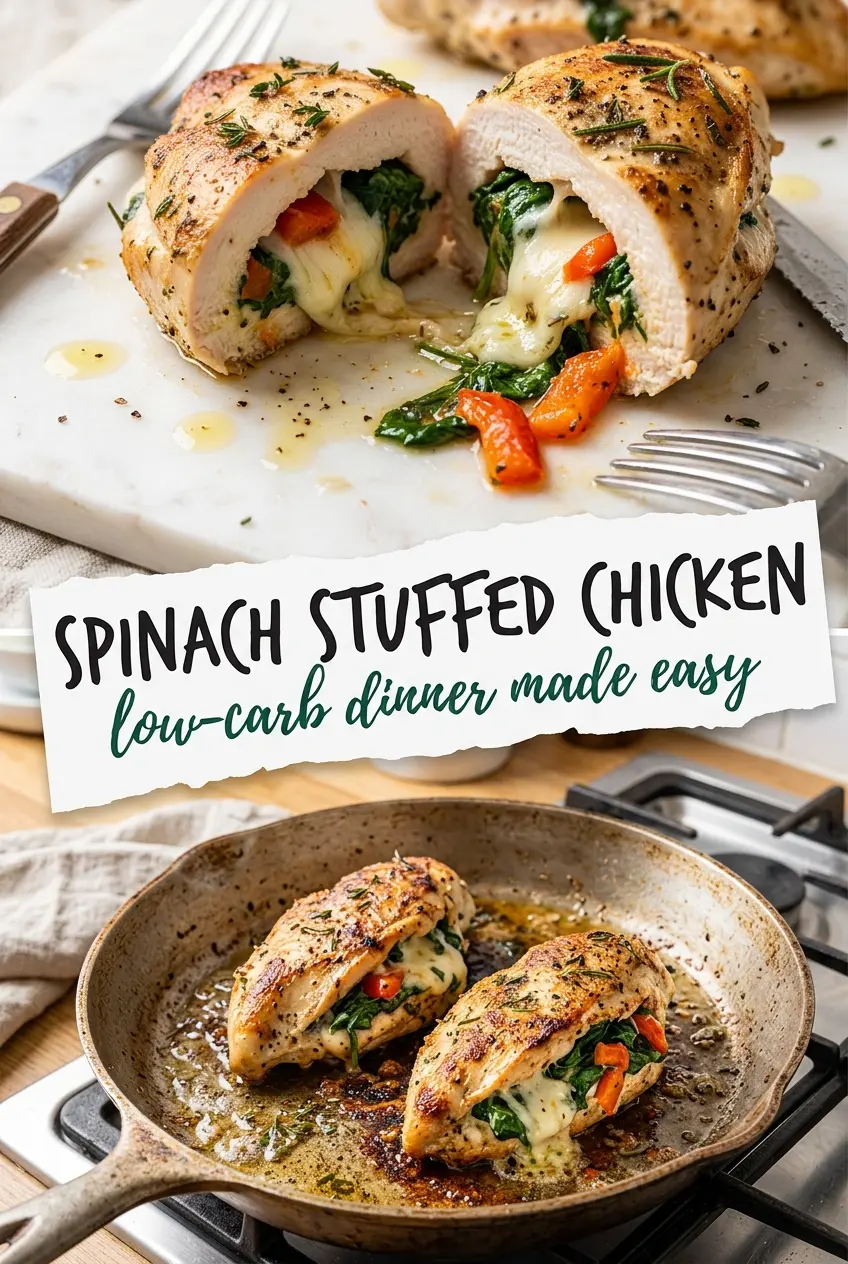
Roasted Red Pepper Spinach And Mozzarella Stuffed Chicken
Ingredients
Equipment
Method
- Preheat the oven to 375°F, then slice a pocket into each boneless chicken breast for stuffing.
- Season the chicken pockets with salt and pepper to taste, then sear in olive oil in a hot skillet until golden on both sides.
- Sauté the baby spinach and minced garlic until wilted, then let cool slightly.
- Mix the wilted spinach, chopped roasted red peppers, and shredded mozzarella until evenly combined.
- Stuff the spinach-roasted red pepper-mozzarella mixture into the chicken pockets.
- Transfer the chicken to a sheet pan and bake for 18–20 minutes at 375°F until cooked through.
- Rest the stuffed chicken for 5 minutes before slicing so the juices settle.