
Roasted tomato sauce tastes like tomatoes that have finally been given the time they deserve. The oven pulls out their sweetness, softens the sharp edges, and turns the onions and garlic into something mellow and almost jammy. What comes out is thicker and deeper than a quick stovetop marinara, with a clean tomato flavor that clings to pasta instead of puddling at the bottom of the bowl.
The trick is roasting the vegetables until the tomatoes blister and collapse at the edges. That caramelization does the heavy lifting, so this sauce doesn’t need a long simmer or a spoonful of sugar to taste balanced. I like to blend it only after the garlic has gone fully soft and the onions have browned at the edges, because that’s where the sauce gets its roundness. A short finish with basil and balsamic wakes everything up without making it taste sweet.
Below, you’ll find the roast time that gets the best color, the swap that works if your tomatoes are a little underripe, and the one mistake that can leave this sauce flat instead of rich.
The tomatoes roasted down into the sweetest sauce, and I didn’t have to add any sugar at all. The garlic squeezed right out and the whole thing tasted like it had been simmering for hours.
Save this roasted tomato sauce for pasta nights when you want a deep, caramelized marinara with no canned tomatoes in sight.
The Roast That Turns Fresh Tomatoes Into Sauce Worth Keeping
The biggest mistake with fresh tomato sauce is treating the tomatoes like they’ll behave the same way canned ones do. Fresh tomatoes carry more water, less concentration, and a lot more variation in sweetness and acidity. Roasting changes that. It cooks off moisture, concentrates the flesh, and gives you browned edges that taste like depth instead of raw sharpness.
That also means the pan matters. Give the tomatoes cut-side up so they can collapse and caramelize instead of steaming in their own juice. If they’re crowded too tightly, you’ll get a thinner sauce with less color. The garlic and onion do important work here too: garlic turns soft and sweet, while onion adds body so the sauce feels finished after blending, not thin and one-note.
What Each Ingredient Is Actually Doing in This Dish
- Fresh ripe tomatoes — Use the ripest tomatoes you can get. This sauce depends on natural sweetness, and bland tomatoes stay bland no matter how long they roast.
- Garlic — Roasting the whole head mellows it enough to blend right into the sauce. If you only have pre-peeled cloves, roast them wrapped in foil so they don’t dry out.
- Onion — Onion adds the backbone that keeps this sauce from tasting like blended tomatoes. Yellow onion is the best all-purpose choice.
- Balsamic vinegar — This is the finishing move, not a sweetener. It sharpens the sauce and makes the roasted flavor pop. If you skip it, add a small splash of red wine vinegar at the end instead.
- Basil — Fresh basil belongs in at the end so it stays bright. Dried basil will work in a pinch, but use only a small amount because it reads heavier and less fresh.
Getting the Tomatoes to Brown Before They Turn Watery
Roasted tomato sauce only works when the vegetables actually roast. If your oven is too low, the tomatoes leak juice and steam instead of caramelizing, and you end up with something pale and flat. At 425°F, the edges blister, the onion softens, and the garlic turns sweet without burning. That heat is what builds the flavor.
Keep the tomatoes cut-side up so the moisture evaporates into the air instead of pooling underneath them. The pan should be large enough that the vegetables have space around them. If they’re packed tight, the steam stays trapped and the sauce loses the roasted taste that makes this worth making in the first place.
Roasting the Vegetables
Line a large sheet pan with parchment, then arrange the tomatoes, onion, and garlic in a single layer. Drizzle with olive oil and season with salt, pepper, and oregano. Roast until the tomatoes are blistered at the edges and the onion has browned in spots, about 40 to 45 minutes. If the garlic looks deeply brown before the tomatoes are ready, pull the cloves off the pan early so they don’t turn bitter.
Blending for Body, Not Foam
Squeeze the roasted garlic from its skins and add it to a blender with the tomatoes and onion. Blend until mostly smooth, not perfectly silky unless that’s the texture you want. If the sauce looks too loose, that’s normal at this stage; it tightens after the short simmer. Blend in batches if needed, and don’t overfill the blender with hot vegetables or the lid can push up from the steam.
The Final Simmer
Pour the sauce into a saucepan, stir in the basil and balsamic vinegar, and simmer for about 5 minutes. This last cook lets the flavors settle and thickens the sauce enough to coat pasta properly. If it still tastes sharp, give it one more minute rather than adding sugar. A good roasted tomato sauce should taste balanced from the tomatoes themselves, not from a workaround.
How to Adapt This for Bigger Tomatoes, Smaller Pan Space, or a Different Diet
Make It Spicy
Add a pinch of red pepper flakes with the oregano before roasting. The heat stays gentle and savory, not sharp, because the oil carries it through the vegetables. If you want a more obvious kick, finish the blended sauce with a second pinch after simmering.
Gluten-Free and Naturally Vegetarian
This sauce is already gluten-free and vegetarian as written, which makes it an easy base for pasta, polenta, or roasted vegetables. The only place to watch is what you serve it with. Pair it with gluten-free pasta and you’ve got a meal that still tastes full and rich.
Using Less-Than-Perfect Tomatoes
If your tomatoes are a little underripe, roast them until the edges are deeply browned and add the balsamic only at the very end. That extra color helps replace the sweetness you’d get from peak-season fruit. The sauce will still work, but it may need the full simmer to taste rounded.
Storage and Reheating
- Refrigerator: Store in an airtight container for up to 5 days. The flavor deepens overnight, and the sauce thickens as it chills.
- Freezer: This freezes beautifully for up to 3 months. Cool it completely, portion it into freezer-safe containers, and leave a little space at the top for expansion.
- Reheating: Warm it gently on the stove over low heat, stirring often. High heat can make the tomato flavor taste flat and can splatter as the sauce loosens back up.
Answers to the Questions Worth Asking
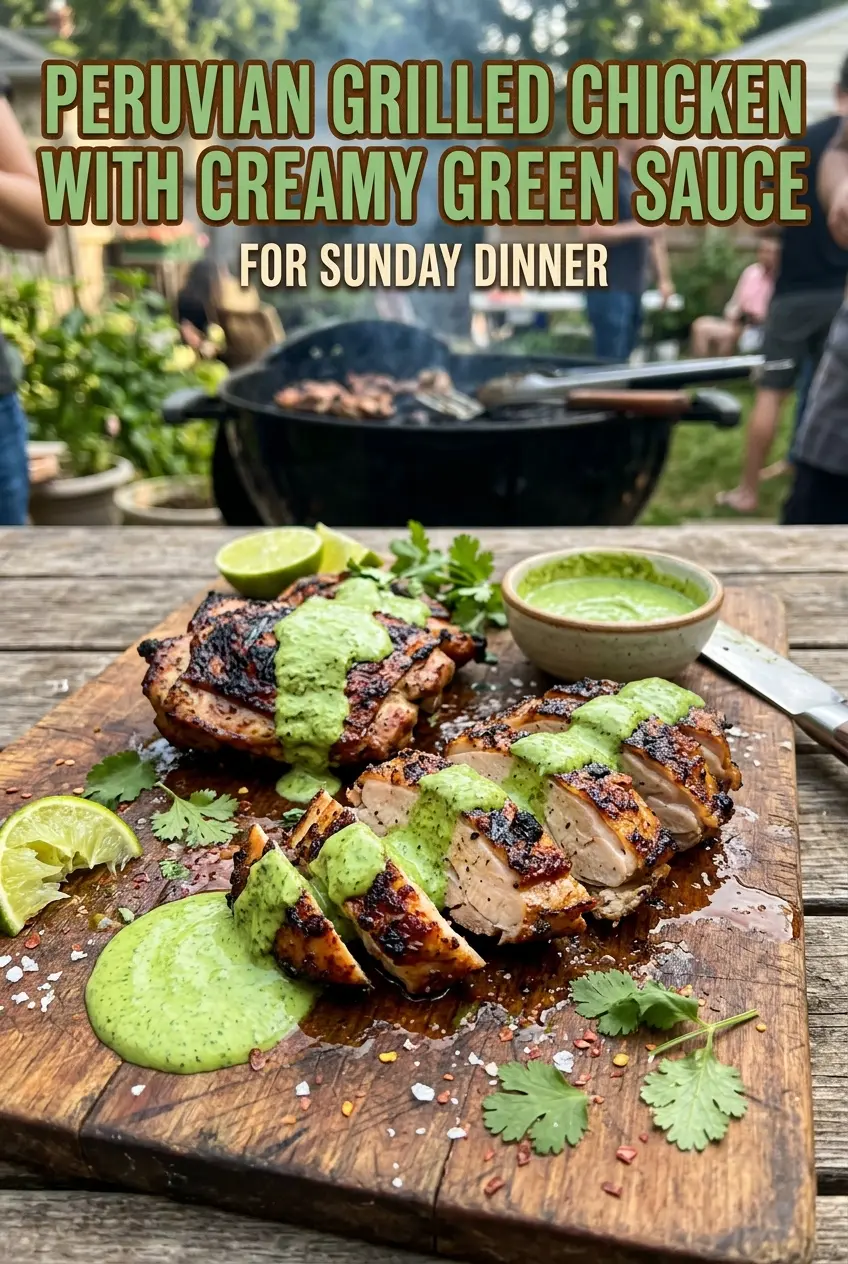
Peruvian Grilled Chicken with Creamy Green Sauce
Ingredients
Equipment
Method
- Whisk minced garlic, soy sauce, lime juice, olive oil, cumin, paprika, and dried oregano until combined, then coat the chicken evenly. Cover and marinate the chicken 8-24 hours in the fridge for deeper flavor and a more tender bite.
- Blend cilantro, jalapenos, mayonnaise, white vinegar, garlic (for sauce), and salt until smooth and jade-green. Taste and adjust salt as needed so the sauce is creamy but tangy.
- Preheat the grill to medium-high heat and lightly oil the grates to prevent sticking. Wait until the grill is hot before cooking the chicken for good char.
- Grill chicken thighs 6-7 minutes per side until charred and cooked through. Aim for an even brown surface so the exterior holds together while staying juicy inside.
- Rest the grilled chicken 5 minutes before slicing to keep the juices in the meat. Slice against the grain if needed for a more tender bite.
- Serve with the creamy green sauce drizzled on top or on the side for dipping. Add extra sauce right before serving so it stays bright and thick.