
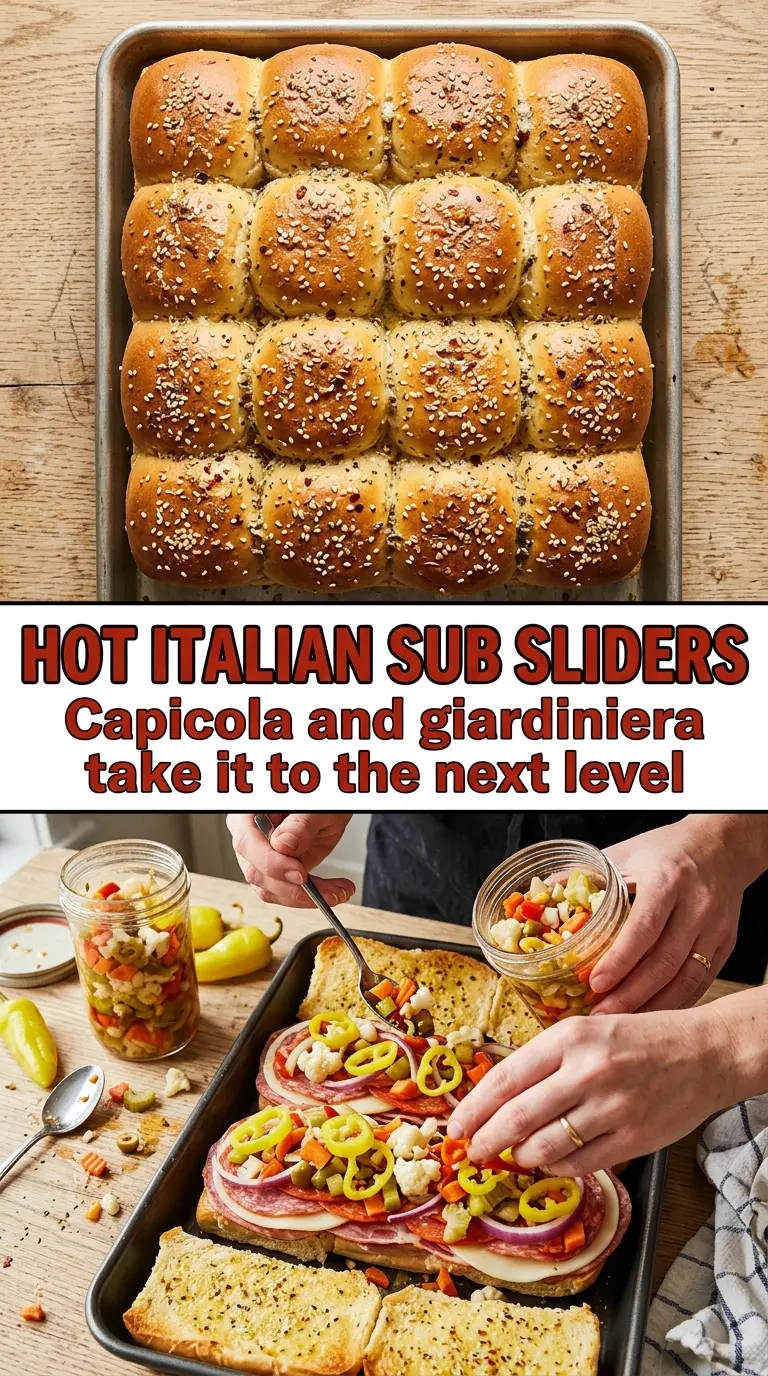
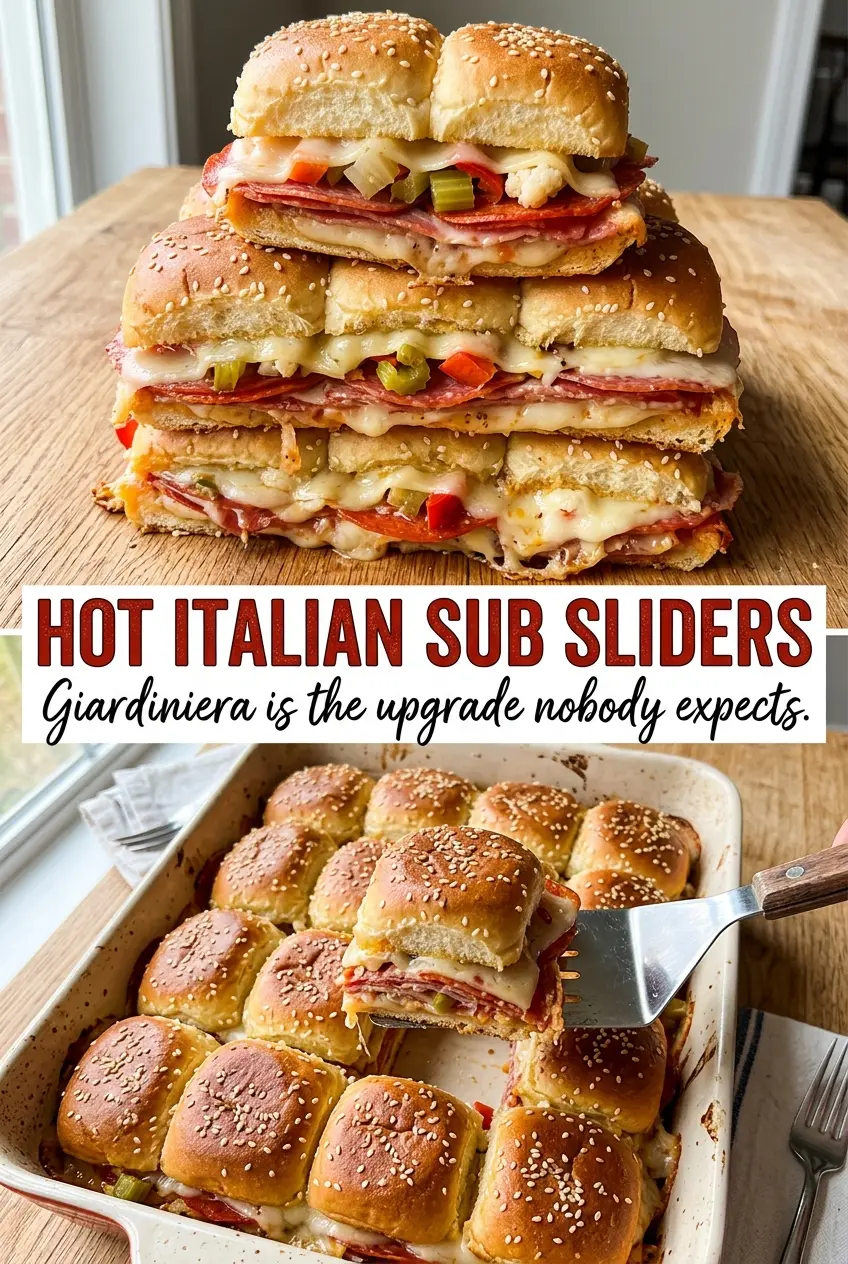
Hot Italian sub sliders bring the best parts of a deli sandwich into one baked tray: crisp-edged rolls, melty provolone, salty layers of salami, pepperoni, and capicola, plus the briny bite of giardiniera that keeps every bite from tasting heavy. Once they come out of the oven, the tops are glossy and toasty, the cheese has fused everything together, and the bottom layer of rolls soaks up just enough dressing to stay soft without going soggy.
Giardiniera is the move that makes this version stand out. Banana peppers add brightness, but giardiniera brings more acidity, more crunch, and a little heat from the mixed vegetables and oil. That matters because these sliders have a lot of richness from the meats and cheese, and without something sharp to cut through it, they can taste flat after a few bites. The butter topping gives the rolls a proper slider finish, and the sesame seeds make them read like a real sandwich, not just a pile of meat on sweet rolls.
Below, you’ll find the small details that keep the sandwiches from sliding apart, plus a few smart swaps if you want to make them milder, cheesier, or a little more crowd-friendly.
The giardiniera gave these sliders a tangy crunch that kept them from tasting too heavy, and the sesame topping made them feel like something from a good sandwich shop. I baked them for exactly 20 minutes and the cheese was perfectly melted without the rolls getting mushy.
Hot Italian sub sliders with giardiniera, melty provolone, and a sesame-topped finish are the kind of tray that disappears fast.
The Reason These Sliders Stay Juicy Instead of Turning Mushy
The biggest mistake with baked sliders is loading them up and then blasting them uncovered from the start. The rolls dry out before the cheese fully melts, and the bottom layer turns soggy from the meat and dressing. Covering the tray for most of the bake traps steam so the cheese melts evenly, then uncovering it at the end lets the tops brown without overcooking the sandwich underneath.
The other detail that matters here is balance. These meats are rich and salty, and the provolone melts into a smooth, mild layer that keeps the sandwich from feeling too aggressive. Giardiniera and banana peppers add acid, which does the job of cutting fat the way mustard would in a cold Italian sub.
What Each Ingredient Is Actually Doing in This Dish
- Hawaiian rolls — Their slight sweetness plays well against the salty meats and tangy peppers. Split them as a connected slab so the sliders bake together and hold their shape when you slice them apart.
- Salami, pepperoni, and capicola — This trio gives you different kinds of pork richness instead of one flat deli note. If you need a shortcut, use a good Italian deli meat blend, but keep at least two textures so the sandwich doesn’t taste one-dimensional.
- Provolone — It melts cleanly and gives you those stretchy, cohesive layers without getting greasy. Mozzarella will work in a pinch, but it tastes softer and less sharp; provolone is the better match for the meats.
- Giardiniera — This is the ingredient that lifts the whole tray. The chopped pickled vegetables add crunch, heat, and acidity, and that sharpness keeps the sliders from feeling heavy after the first bite.
- Banana peppers — They add a familiar deli-style tang and a gentler heat than the giardiniera. If you want more bite, use a little of the pickling liquid from the giardiniera in the drizzle.
- Butter, Italian seasoning, garlic powder, and sesame seeds — The butter mixture browns the tops and seasons the bread all the way across the tray. Sesame seeds are small, but they change the finish; they give the rolls the feel of a seeded sub bun instead of plain sweet rolls.
The 20 Minutes That Actually Matter
Building the Meat and Cheese Layers
Lay the bottom half of the rolls in one connected sheet and build from there. Start with meat, then cheese, then the peppers and giardiniera so the pickled vegetables sit between the meat and the top bun instead of falling out when you cut the tray. If you pile the wet ingredients directly against the bread, the rolls absorb too much liquid and go past soft into soggy.
Brushing on the Butter Topping
Mix the melted butter with the Italian seasoning and garlic powder, then brush it across the tops so every roll gets covered edge to edge. The goal is an even sheen, not puddles in the seams. Too much butter in one spot will soak the bread and make the top greasy instead of toasty.
Covered Bake, Then a Short Finish
Bake covered first so the cheese melts before the rolls brown. After about 15 minutes, lift the foil and let the top bake uncovered until the sesame seeds toast and the buns turn deep golden at the edges. If the tops brown too fast, your oven is running hot; pull the tray early and let the residual heat finish the center.
Three Ways to Adapt These Sliders Without Losing the Point
Make Them Milder for a Mixed Crowd
Cut the red pepper flakes in half or leave them out, and use only banana peppers instead of the full giardiniera amount. You’ll lose some heat, but you’ll keep the briny, deli-style balance that makes the sliders taste complete.
Make Them Gluten-Free
Use sturdy gluten-free rolls that can handle being sliced and baked as a connected slab. The filling works the same way, but watch the final uncovered bake closely, because gluten-free buns can dry out faster than Hawaiian rolls.
Swap the Meat for a Lighter Tray
Use turkey pepperoni and turkey salami if you want something a little leaner, but keep the capicola or replace it with another bold cured meat so the sliders still taste like an Italian sub. If you go too mild with the meat, the peppers and cheese take over and the tray loses its deli-shop character.
Make It Ahead for a Party
Assemble the tray a few hours ahead, cover it tightly, and wait to add the butter topping until just before baking. That keeps the bread from softening too much while still giving you the fast, crowd-friendly bake when guests arrive.
Storage and Reheating
- Refrigerator: Store leftovers in an airtight container for up to 3 days. The rolls soften a bit as they sit, but the flavor holds up well.
- Freezer: These freeze best before baking. Wrap the assembled tray tightly and freeze for up to 1 month, then thaw in the fridge before adding the butter topping and baking.
- Reheating: Reheat covered in a 325°F oven until warmed through, then uncover for a minute or two so the tops perk back up. The microwave works, but it softens the bread and mutes the sesame topping.
Answers to the Questions Worth Asking
Hot Italian Sub Sliders
Ingredients
Equipment
Method
- Preheat the oven to 350°F. Place a sheet pan in the oven to warm briefly if desired.
- Slice the Hawaiian rolls horizontally, keeping them connected. Lay them open on the sheet pan.
- Layer the salami, pepperoni, capicola, provolone, banana peppers, and giardiniera over the bottom halves. Spread evenly so every slider gets toppings.
- Drizzle the Italian dressing and red pepper flakes over the filling. Replace the tops of the rolls.
- Mix the melted butter with Italian seasoning and garlic powder. Brush over the tops and scatter sesame seeds.
- Cover the sliders with foil and bake for 15 minutes at 350°F. Look for the cheese to start melting under the foil.
- Uncover and bake for 5 minutes at 350°F until the tops are golden. Watch for browned edges on the roll tops.
- Slice the baked sliders apart and serve hot. Serve immediately for the best melty texture.