
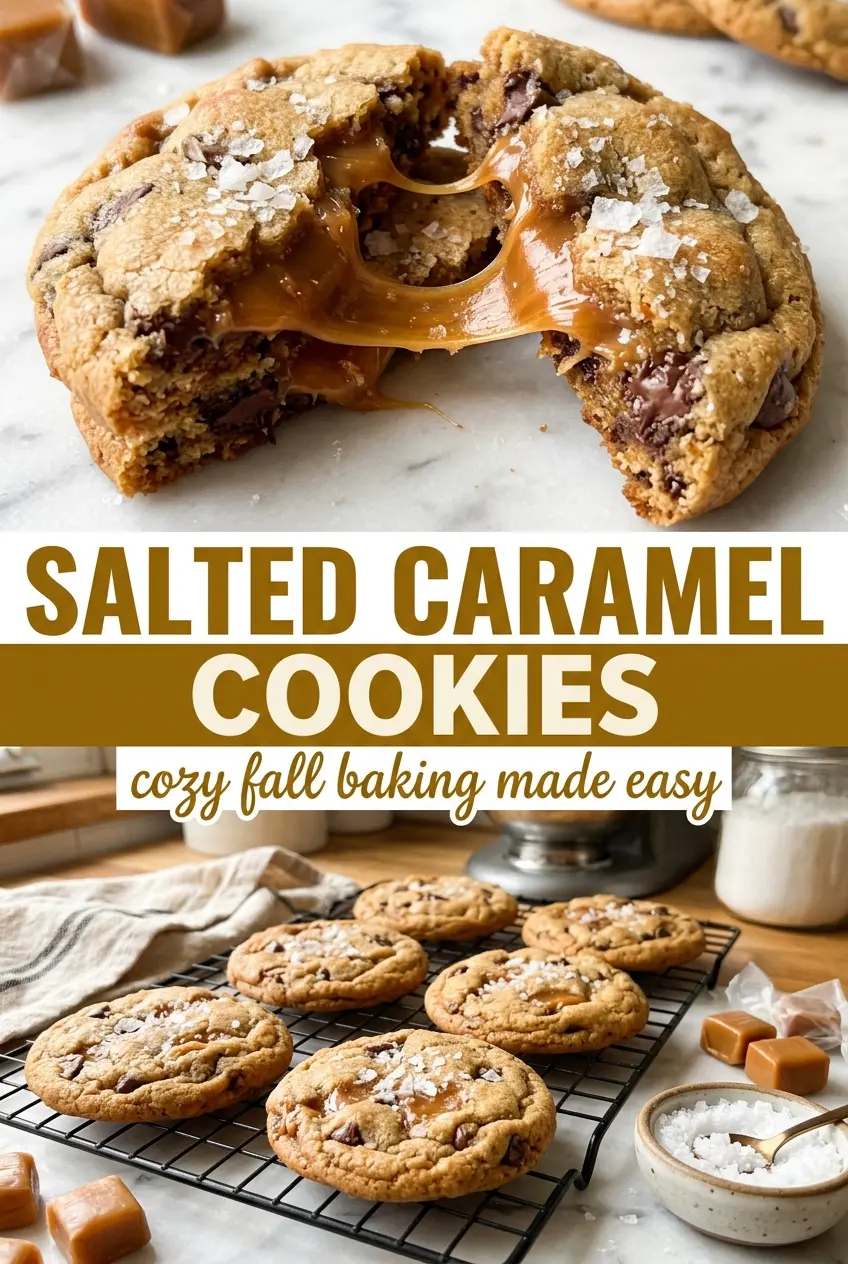
Chewy salted caramel cookies hit that sweet spot where the edges bake up set and buttery while the centers stay soft enough to give way to a molten caramel core. The salt on top keeps them from tasting flat, and the texture is the part people remember: crisp at the rim, tender in the middle, with a stretchy, amber center that pulls apart when the cookie is still warm.
The trick is keeping the dough thick enough to fully seal around the caramel candies. Melted butter gives these cookies a denser, chewier crumb, but it also means the dough can spread if it goes into the oven too warm. A short chill in the freezer helps the cookies hold their shape long enough for the caramel to melt without leaking out.
Below, I’ve included the one step that matters most for keeping the filling inside, plus a few easy swaps if you want to change the finish without losing that gooey center.
The caramel stayed gooey instead of leaking out, and the flaky salt on top made these taste like something from a bakery. I froze the dough balls for a few minutes like suggested and they baked up thick and soft.
These salted caramel cookies bake up thick, chewy, and stuffed with a gooey center that stays soft after cooling.
The Part Where Most Filled Cookies Leak
The filling is what makes these cookies special, but it’s also the part that causes trouble. If the dough is too thin, the caramel finds a seam and oozes out before the cookie sets. If the dough is too warm, the cookies spread too fast and the filling has nowhere to stay. That’s why these work best when the dough is soft but not greasy, and the caramel is tucked in completely with no gaps at the bottom.
The other thing worth knowing is that the cookies keep baking after they leave the oven. Pull them when the edges look set and the centers still look a little underdone. That slight softness is what gives you a chewy cookie instead of a dry one, and the caramel will finish melting as they cool on the pan.
What Each Ingredient Is Actually Doing in This Dough

- All-purpose flour — This gives the cookie enough structure to hold the caramel center. Too little flour and the dough spreads; too much and the cookies turn dry and cakey.
- Melted butter — Melted butter makes the crumb denser and chewier than creamed butter would. Let it cool before mixing, or it can start melting the sugars too early and leave the dough oily.
- Brown sugar — This is the main reason the cookies stay soft. Its molasses content adds moisture and a deeper caramel note that pairs with the filling.
- Granulated sugar — A little white sugar helps the edges bake with a thinner, slightly crisp finish. You need both sugars here; using only brown sugar makes the cookies too soft and heavy.
- Egg plus egg yolk — The extra yolk adds richness and chew without making the dough loose. If you only use one whole egg, the texture is still good, but the centers won’t feel as plush.
- Soft caramel candies — These are the heart of the recipe. Use soft caramels that melt smoothly; hard caramels or caramel squares with a firm shell won’t give you that stretchy center.
- Flaky sea salt — The salt on top matters because it sharpens the caramel and keeps each cookie from tasting one-note. Use flaky salt, not table salt, so you get those little bright crunches on the surface.
Getting the Dough Around the Caramel Without a Mess
Mix the dough until it just comes together
Stir the dry ingredients into the butter and sugar mixture until you don’t see streaks of flour, then stop. Overmixing after the flour goes in tightens the dough and can make the finished cookies tougher. The dough should feel soft and scoopable, not runny.
Wrap the caramel completely
Press a spoonful of dough flat in your palm, set the caramel in the center, then fold the dough up and around it from every side. Pinch the seam shut, because any weak spot will open in the oven and leak caramel. Roll the dough gently between your hands after sealing so the cookie bakes evenly.
Chill the dough balls before baking
Ten minutes in the freezer is enough to firm the butter and slow the spread. That short chill is the difference between thick cookies and puddles. If your kitchen runs warm, give them a few extra minutes so the outside sets before the caramel gets a chance to escape.
Bake until the edges set and the centers still look soft
Bake at 350°F just until the edges look dry and lightly golden. The centers should still look slightly puffed and underbaked when you pull the tray, because they’ll settle as they cool. Sprinkle the flaky salt right away so it sticks to the warm tops instead of sliding off.
How to Adapt These Cookies for Different Kitchens
Dairy-Free Version
Swap the butter for a good dairy-free baking stick and use dairy-free soft caramels. The texture stays chewy, but the flavor loses a little of that classic buttery finish, so the flaky salt becomes even more important.
Extra Gooey Center
Use a slightly larger piece of caramel, but don’t overload the center. Too much filling is what causes blowouts, and a single soft candy already gives you that pull-apart middle without breaking the cookie.
Gluten-Free Version
A cup-for-cup gluten-free flour blend works here as long as it includes xanthan gum. The cookies may spread a little less and bake up slightly more delicate, but the caramel center still works well if you seal the dough carefully.
Make-Ahead Dough
Shape the filled dough balls and freeze them on a tray, then move them to a bag once solid. Bake from frozen and add 1 to 2 minutes, which helps the cookies stay thick and keeps the caramel from running too early.
Storage and Reheating
- Refrigerator: Store in an airtight container for up to 5 days. The cookies stay chewy, though the caramel center firms up once chilled.
- Freezer: Freeze baked cookies for up to 2 months, layered with parchment. You can also freeze the filled dough balls and bake them later for the best texture.
- Reheating: Warm a cookie in the microwave for 8 to 10 seconds or in a low oven for a few minutes. If you heat them too long, the caramel can turn scalding and the cookie dries out before the center softens.
Answers to the Questions Worth Asking
Chewy Salted Caramel Cookies
Ingredients
Equipment
Method
- Whisk all-purpose flour, baking soda, and salt together in a bowl until evenly combined.
- Beat melted and cooled unsalted butter with brown sugar and granulated sugar until smooth and combined.
- Mix in egg, egg yolk, and vanilla extract until glossy and fully incorporated.
- Stir the dry ingredients into the wet mixture just until a soft dough forms, with no dry flour remaining.
- Wrap a spoonful of dough around each soft caramel candy, sealing completely so the candy is fully enclosed.
- Arrange the filled cookies on a sheet pan, leaving space between each one.
- Bake at 350°F for 11-13 minutes, until the edges are set and the centers still look slightly soft.
- Sprinkle flaky sea salt immediately after baking while the cookies are still warm so it adheres.