
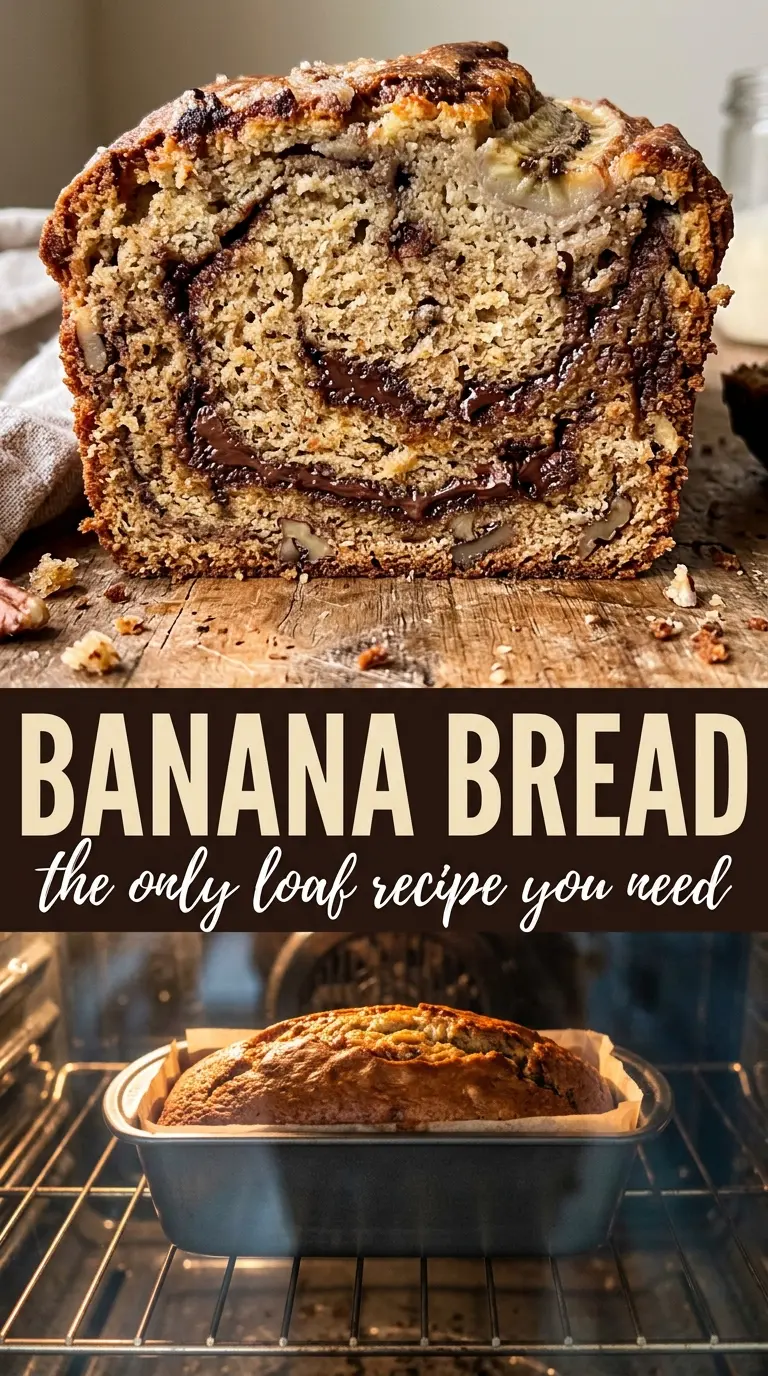
Moist banana bread with a deep golden crust and a tender, almost custardy crumb disappears fast when the bananas are ripe enough to spot from across the counter. The best loaves don’t taste like plain quick bread with a little banana mixed in. They taste like concentrated banana flavor, browned edges, and a soft center that slices cleanly once it cools.
The trick is using bananas that are past the point most people want to eat out of hand. The darker the peel, the better the bread, because those bananas mash into a sweeter, more fragrant base that carries the whole loaf. Melted butter keeps the texture plush, and the egg gives the batter enough structure to hold together without turning cakey. If you add the optional peanut butter or Nutella swirl, it sinks into the top and bakes into those glossy pockets that make each slice feel a little special.
Below you’ll find the timing that keeps this loaf from drying out, plus the small mixing detail that matters most if you want a soft crumb instead of a tough one. The swirl option is worth reading through even if you usually keep banana bread plain.
The crumb stayed incredibly moist for days, and the Nutella swirl gave the top this fudgy layer that my kids kept picking off first.
Save this banana bread for the next time you have overripe bananas and want that caramelized crust with a soft, moist crumb.
The Banana Ripeness Rule That Changes Everything
Banana bread can taste flat when the bananas are only yellow with a few brown spots. That stage gives you moisture, but not much depth. You want bananas that are heavily freckled or nearly black, because the starches have broken down far enough to give the loaf a sweeter, fuller banana flavor without needing extra sugar to carry it.
The other common mistake is overmixing once the flour goes in. Quick breads should look a little rough in the bowl when you stop stirring. If you beat the batter smooth, the flour develops too much gluten and the loaf turns tight instead of tender. This recipe stays soft because the batter is mixed just until the flour disappears.
What Each Ingredient Is Actually Doing in This Loaf
- Very ripe bananas — These are the whole point of the loaf. The blacker bananas aren’t just softer; they’re sweeter, more aromatic, and mash into a base that tastes baked-in rather than added on. If yours are still a little firm, bake them in their skins at 300°F until the peels darken and the fruit softens.
- Melted butter — Butter gives the bread richness and helps the crumb stay moist after cooling. Melted butter blends in without creaming, which keeps this a simple one-bowl batter. If you only have oil, use a neutral oil in the same amount for a softer, slightly less buttery loaf.
- Granulated sugar — Sugar sweetens the loaf, but it also helps the top caramelize into that thin crust everyone fights over. Brown sugar can replace part of it if you want a deeper molasses note, though the crumb will be a touch softer and darker.
- Egg — The egg binds the batter and gives the loaf enough lift to hold together neatly when sliced. One egg is enough here because the bananas already add a lot of moisture.
- Baking soda — This reacts with the acidity in the bananas and helps the loaf rise. If your baking soda is old, the bread can bake up dense and underwhelming, so fresh soda matters more here than it does in many other bakes.
- Flour — All-purpose flour gives the loaf its structure without making it heavy. Spoon it into the measuring cup and level it off if you’re not weighing, because packed flour is one of the fastest ways to dry out banana bread.
- Peanut butter or Nutella swirl — This is optional, but it changes the whole top of the loaf. Peanut butter adds a salty, nutty contrast, while Nutella bakes into a glossy chocolate-hazelnut ribbon. Warm it slightly if it’s stiff so it swirls instead of tearing through the batter.
Building the Batter Without Making It Tough
Mashing the Bananas Until They’re Almost Smooth
Start by mashing the bananas in a large bowl until only a few small lumps remain. Those little bits melt into the crumb and give the bread a more natural banana texture, while a completely smooth puree can make the batter feel a little heavy. If the bananas are underripe, stop now and wait for better fruit; the flavor difference is huge.
Mixing in the Wet Ingredients
Stir in the melted butter, sugar, egg, and vanilla until the mixture looks glossy and even. It doesn’t need to be whipped or aerated. If the butter is scorching hot, let it cool for a few minutes first so it doesn’t start cooking the egg on contact.
Adding the Dry Ingredients Last
Sprinkle in the baking soda, salt, and flour, then fold just until the dry streaks disappear. A few small flour pockets are better than an overmixed batter. This is the stage where banana bread goes from tender to rubbery if you keep stirring for the sake of a perfectly smooth bowl.
Swirling and Baking the Loaf
Pour the batter into a greased 9×5 loaf pan and drop spoonfuls of peanut butter or Nutella over the top if you’re using it. Drag a skewer through the surface in a loose figure-eight pattern so the swirl stays distinct instead of blending into the batter. Bake until the center is set and a toothpick comes out clean, then let it cool in the pan for 15 minutes before slicing. Cutting too soon smears the crumb and makes the loaf seem underbaked even when it isn’t.
Three Ways to Make This Banana Bread Work for Different Kitchens
Dairy-Free Banana Bread
Swap the melted butter for the same amount of neutral oil or melted coconut oil. Oil gives the softest texture, while coconut oil adds a faint coconut note that works well with the banana. The loaf will still bake up moist and tender, just a little less rich on the palate.
Gluten-Free Version
Use a 1:1 gluten-free baking flour blend in place of the all-purpose flour. The batter should look the same, but the loaf may need a few extra minutes in the oven to set in the center. Let it cool completely before slicing so the crumb has time to firm up.
Chocolate-Hazelnut Top
Use Nutella for the swirl and keep it concentrated on the top instead of stirring it through the batter. That way you get a dramatic top layer that bakes into a soft, fudgy ribbon rather than muddying the whole loaf. It’s the best move when you want banana bread that looks bakery-style without extra work.
Storage and Reheating
- Refrigerator: Store tightly wrapped for up to 4 days. The crumb stays moist, though the top crust softens a little after the first day.
- Freezer: Banana bread freezes well. Wrap the whole loaf or individual slices in plastic, then foil, and freeze for up to 3 months.
- Reheating: Warm slices in a toaster oven or microwave just until heated through. Overheating dries out the edges fast, so use short bursts instead of a long heat cycle.
Answers to the Questions Worth Asking

Banana Bread Recipe
Ingredients
Equipment
Method
- Preheat the oven to 350°F, and set an oven rack to the middle position. Grease a 9×5 loaf pan thoroughly so the loaf releases cleanly.
- Mash the bananas thoroughly in a large bowl until almost smooth. Leave only a few tiny lumps for best texture.
- Stir in the melted butter, granulated sugar, egg, and vanilla until glossy and evenly combined. Mix just until no dry pockets remain.
- Add the baking soda and salt, then stir briefly to distribute. The batter may look slightly thicker as the baking soda activates.
- Fold in the all-purpose flour until just combined, stopping as soon as you don’t see streaks. Do not overmix to keep the crumb tender.
- Pour the batter into the prepared loaf pan and smooth the top. Tap the pan once to help the batter settle.
- For swirl, drop spoonfuls of peanut butter or Nutella on top, then add brown sugar and cinnamon if using. Drag a skewer through the surface to create swirls.
- Bake for 60–65 minutes at 350°F, until a toothpick inserted in the center comes out clean. If the top browns too quickly, loosely tent with foil for the last 10 minutes.
- Cool the loaf in the pan for 15 minutes before slicing. This helps the center set so slices hold their shape.